")
Gas Fee Estimator for DEX Transactions
Estimated Gas Fee
Quick Takeaways
- Choose a Web3‑compatible wallet (MetaMask, Coinbase Wallet, Trust Wallet) and fund it with the native token for gas.
- Connect your wallet to a DEX (Uniswap, Curve, PancakeSwap) via the website’s "Connect" button.
- Set slippage tolerance (1‑3% is a safe starter) and approve the token before swapping.
- Watch gas fees: Ethereum can cost $1‑$5 for small trades, while Layer‑2s or Solana drop below $0.01.
- If you plan to provide liquidity, understand impermanent loss and concentrate liquidity ranges.
Trading crypto without a middleman feels futuristic, but the steps are surprisingly simple once you get the basics down. Below is a practical walk‑through that takes you from a brand‑new wallet to a successful token swap on a modern decentralized exchange a peer‑to‑peer platform that uses smart contracts to match trades directly from users’ wallets. We’ll also cover common hiccups-like gas‑fee surprises and slippage errors-so you can troubleshoot on the fly.
1. Set Up a Web3‑Compatible Wallet
The first job is to have a wallet that can speak the language of DEXs. The most popular choice is MetaMask a browser extension and mobile app that lets you manage Ethereum‑compatible private keys, but Coinbase Wallet and Trust Wallet work just as well.
- Install: Download the extension or app; the onboarding flow usually finishes in under two minutes.
- Secure: Write down the 12‑word seed phrase on paper, store it offline.
- Fund: Send a small amount of the native blockchain token (e.g., ETH for Ethereum, BNB for BNB Chain). For a first trade on Ethereum, 0.02ETH (≈$4) covers most gas costs.
2. Choose the Right DEX for Your Trade
Not all DEXs are created equal. Uniswap an automated market maker (AMM) on Ethereum that hosts hundreds of thousands of token pairs dominates Ethereum volume, while Curve excels at stablecoin swaps and PancakeSwap leads on BNB Chain. Your choice depends on three factors:
- Blockchain: Ethereum has higher fees but broad token coverage; BNB Chain and Polygon are cheaper.
- Liquidity: Higher liquidity reduces slippage. Check the pool size on the DEX interface.
- Feature set: Some DEXs offer limit orders (via aggregators) while others are pure swaps.
3. Connect Your Wallet to the DEX
Once you land on the DEX website (e.g., uniswap.org), look for the "Connect Wallet" button. Click it, select your wallet type, and approve the connection in the wallet extension. The whole process averages about 15 seconds for seasoned users.
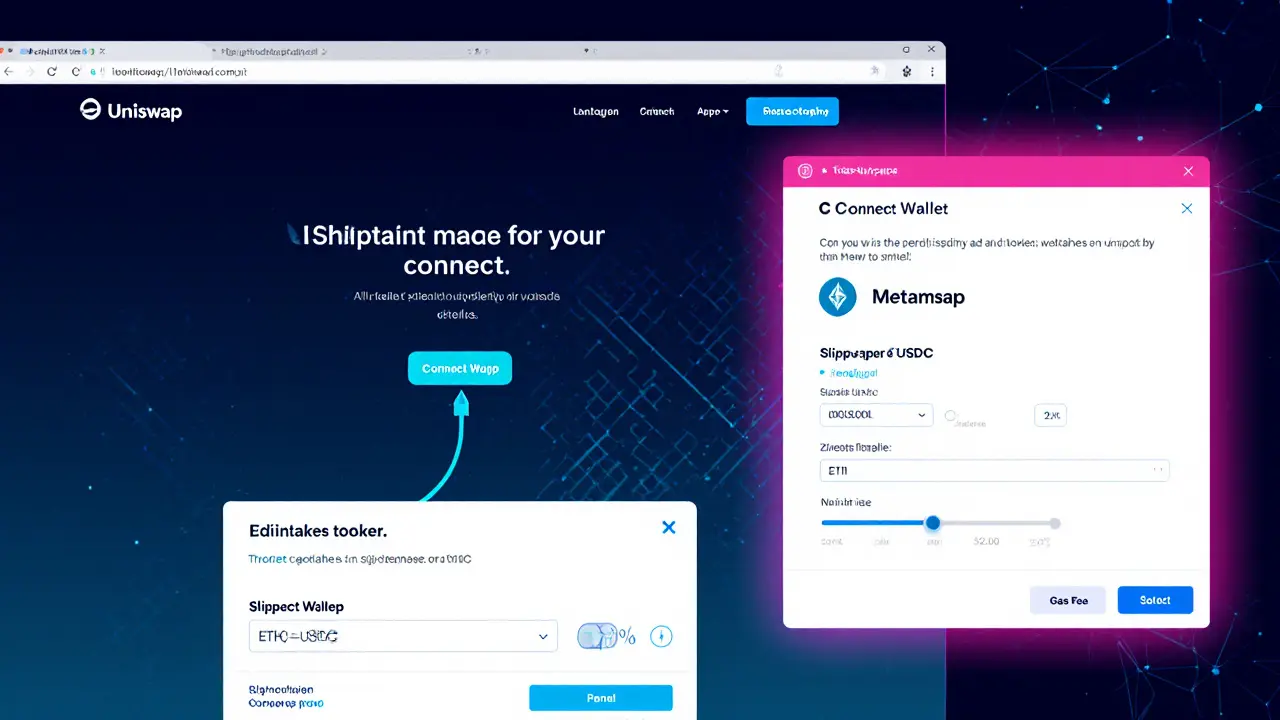
4. Pick the Token Pair and Set Slippage
Now you choose what you’re swapping. Suppose you want to trade ETH for USDC. Select the two tokens from the dropdown menus. Next, set a slippage tolerance. Slippage is the price movement that can happen between the moment you submit the transaction and when it’s mined. Most guides recommend starting with 1‑3% on Ethereum; on low‑volatility pairs you can drop it to 0.5%.
5. Approve the Token (If Required)
For ERC‑20 tokens, the DEX needs permission to move the token on your behalf. This triggers an "Approve" transaction, which costs a small amount of gas. Once approved, the token can be swapped repeatedly without another approval-unless you revoke it later.
6. Execute the Swap
Press the "Swap" button, confirm the details (amount, price impact, fee), and hit "Confirm" in your wallet. On Ethereum, the transaction typically confirms in 15‑30 seconds; on Solana it can be sub‑second. After confirmation, you’ll receive a transaction hash you can view on a block explorer (Etherscan for Ethereum, Solscan for Solana).
7. Verify the Transaction and Manage Your Assets
Open the block explorer link provided by your wallet to see the exact gas used and final price. If the price impact looks too high, you can revert the trade (if the token still exists) or simply accept the loss-unfortunately DEXs lack stop‑loss orders.
8. Common Pitfalls and How to Fix Them
- Insufficient gas: The error shows up in 22% of first‑time attempts. Always keep a buffer of native tokens-about 0.03ETH for a typical swap.
- Slippage exceeded: Reduce the tolerance only if the market is stable; otherwise increase it to avoid failed trades.
- High fees on Ethereum: Switch to a Layer‑2 like Arbitrum or Optimism, where fees drop by 80‑90% (Nikhilesh De, CoinDesk, 2024).
- Impermanent loss (if providing liquidity): Use concentrated liquidity ranges (Uniswap V3) and monitor price movements; a 20% volatility can erode 5‑6% of your capital over a month.
9. Quick Comparison: DEX vs. Centralized Exchange
| Aspect | Decentralized Exchange | Centralized Exchange |
|---|---|---|
| Custody | Non‑custodial; you control private keys | Custodial; exchange holds your keys |
| KYC Requirement | None (privacy‑preserving) | Mandatory for most platforms |
| Typical Fees | 0.3% trading fee + gas (≈$1‑$5 on Ethereum) | 0.20‑0.60% trading fee, no gas |
| Liquidity Depth | Varies by pool; top DEXs hold $64B TVL (Q22024) | Higher on popular pairs, but limited to listed assets |
| Speed | 15‑30s on Ethereum, sub‑second on Solana | Instant (off‑chain matching) |
| Support | Community‑driven, limited official help | 24/7 customer service |
10. Next Steps: From Swapper to Liquidity Provider
If you’re comfortable swapping, the natural progression is to add liquidity. Pick a pool on Uniswap V3, set a price range you’re confident about, and deposit equal values of the two tokens. Remember, you’ll earn a portion of the 0.05‑0.30% pool fee, but you also expose yourself to impermanent loss. Many traders start with stablecoin pairs (USDC/DAI) where price variance is minimal.
Frequently Asked Questions
Do I need to verify my identity to use a DEX?
No. DEXs are built to be permissionless. You only need a wallet and some native tokens for gas.
Why is my transaction failing on Ethereum?
Common reasons are insufficient gas, slippage set too low, or network congestion. Increase your gas limit and adjust slippage to 2‑3% for volatile pairs.
Are DEX fees higher than CEX fees?
On Ethereum the gas cost can make a small trade expensive, but Layer‑2 solutions bring fees down to well under $0.01, making DEXs competitive with most centralized fees.
Can I trade directly from a hardware wallet?
Yes. Ledger and Trezor integrate with MetaMask and other Web3 browsers, letting you sign DEX swaps without exposing private keys to your computer.
What is “impermanent loss” and should I worry about it?
Impermanent loss occurs when the price ratio of the two tokens in a liquidity pool changes. It’s a real risk for LPs, especially in volatile markets. Using concentrated liquidity or stablecoin pools can mitigate it.
27 Responses
Nice walkthrough, really breaks down the whole DEX flow without overwhelming anyone. If you’re just starting, set up MetaMask first and grab a little ETH for gas-no need to buy a ton right away. Keep an eye on slippage and you’ll be good to go.
Whoa, this guide feels like a blockbuster script-every step is a plot twist, but the climax is a smooth swap! The way you highlighted gas fee differences across chains is pure gold. Seriously, I’m impressed by the detail without drowning the reader.
Alright, let’s dive deep into the DEX universe-first, you need a wallet that’s Web3‑ready, like MetaMask, Coinbase Wallet, or Trust Wallet, because they’re the gateway to the blockchain playground. 🚀 Next, fund that wallet with the native token of your chosen network; you’ll need ETH for Ethereum, MATIC for Polygon, or SOL for Solana to cover gas fees, and trust me, gas can be a silent wallet‑drainer if you’re not careful. When you hit “Connect” on the DEX site, you’re essentially authorizing a smart contract to interact with your wallet, so double‑check you’re on the legit URL.
Now, before you swap, set your slippage tolerance-typically 1‑3% is a safe buffer; higher slippage can protect you from volatile price swings but also costs more.
Approve the token if it’s an ERC‑20 that hasn’t been approved yet; this is a one‑time transaction that lets the DEX pull the token from your wallet.
When you finally hit “Swap,” the DEX routes your order through liquidity pools, and the smart contract executes the trade atomically, meaning you get your new token or the transaction reverts-no partial fills.
Watch the estimated gas fee; on Ethereum mainnet a simple swap can cost $1‑$5, while on Layer‑2s like Arbitrum or Optimism it drops to pennies, and on Solana it’s often a fraction of a cent.
If you’re providing liquidity, remember the concept of impermanent loss-if the price diverges significantly, you might end up with less value than just holding the assets.
Concentrated liquidity, a feature on Uniswap V3, lets you allocate capital in a price range you expect the pair to trade, boosting fee earnings.
Should you encounter a “nonce too low” error, it usually means you have pending transactions; just bump the gas price or wait for the mempool to clear.
In case the transaction fails due to “out‑of‑gas,” increase the gas limit slightly; the UI usually suggests a safe default.
For token swaps involving obscure assets, always verify the contract address on a block explorer to avoid honeypots.
If you’re on a DEX aggregator like 1inch, it’ll search multiple DEXes for the best rate-useful when the market is fragmented.
Finally, after the swap, consider moving your tokens to a hardware wallet for long‑term storage; it adds a layer of security.
Overall, the key is to start small, understand each step, and experiment gradually-once you get the hang of it, decentralized trading feels like second nature. 😊
That was a solid dive, and I’d add that thinking of DEXs as cooperative ecosystems helps temper the fear of “no middleman.” By treating each swap as a mutual agreement between peers, the risk feels more shared than imposed. Also, keeping a small reserve of the native token on‑hand can prevent those unexpected gas spikes from halting your activity.
Love how you broke down the slippage part-lots of newcomers dread it, but a little tolerance is a lifesaver. When I first started, I set it to 0.5% and got burned; now I keep it at 2% for most trades and adjust only for volatile pairs.
Very clear steps! Just a quick reminder: always double‑check the network you’re connected to in MetaMask before approving anything. Switching networks mid‑approval can lead to lost fees.
While your guide is thorough, I’d caution users to verify the contract address of any new token-scammers still push fake tokens that can steal funds instantly.
Great energy! The optimism about DeFi’s future really shines through. Keep the community vibe alive, it’s what makes these platforms thrive.
Gas fees can surprise you.
Honestly, the guide reads like a textbook. A bit more real‑world examples would make it less dry.
One tip I’d add: after swapping, check the token’s decimal places. Some tokens use 8 decimals instead of 18, which can make balances look off at first glance.
Fine guide, but the “watch gas fees” line is redundant-everyone knows gas costs money.
Interesting take, though I’d argue that centralized exchanges still hold a place for large‑scale traders who need deeper liquidity pools and fiat on‑ramps. Decentralization isn’t a one‑size‑fits‑all.
OMG, the DEX vibe feels like a turbo‑charged rollercoaster-so many moving parts, but the thrill is unmatched! Just remember to strap in with proper security.
I think the author missed a crucial philosophical angle here-DEXs embody the decentralization ethos, which is a radical shift from custodial trust models, and that shift has deep implications for personal sovereignty and financial autonomy. 🤔
When you hand over control to a smart contract, you’re effectively delegating authority to immutable code, which raises questions about accountability and recourse.
Moreover, the open‑source nature of these protocols means anyone can audit the code, but also that malicious actors can fork and exploit vulnerabilities.
It’s a double‑edged sword; the community must stay vigilant, fostering a culture of rapid response and transparent governance.
In practice, that means participating in DAO votes, submitting bug reports, and even contributing to audits if you have the skill set.
Another point is the environmental impact-while Layer‑2 solutions reduce energy consumption, the underlying proof‑of‑work chains still carry a heavy carbon footprint.
Balancing innovation with sustainability is a conversation we can’t ignore.
Finally, the user experience is still improving; onboarding friction remains high for newcomers, which is why educational guides like this are essential.
All in all, DEXs are not just tools but a movement toward a more open financial future.
Look, your deep‑dive is cool, but you gloss over the fact that many users still fall for phishing scams on fake DEX sites. It’s not just about code-human error is the biggest attack vector. Make sure to double‑check URLs and use bookmark links.
Wow, thanks for the guide-just wish the tone wasn’t so earnest, it’s almost like a lecture. Anyway, good job.
Solid steps! Start small, learn the ropes, then scale up. Confidence builds with each successful swap.
This is another glorified hype piece-DEXs are still riddled with hidden risks that most newbies don’t even see.
Appreciate the balanced view-covering both swaps and liquidity provision gives a fuller picture. Keep emphasizing security best practices.
Great guide! 👍👍👍
I commend the thoroughness of this post; it equips newcomers with the pragmatic knowledge needed to navigate DEX ecosystems safely and effectively.
From a cultural lens, the rise of DEXs mirrors a broader shift toward peer‑to‑peer interactions across many domains, breaking down traditional hierarchies and fostering global collaboration.
Good summary, thanks.
This walkthrough hits the sweet spot-clear, concise, and practical without overwhelming jargon. Nice job!
Honestly, all these “user‑friendly” guides are just a front; the real power lies in the deep, hidden protocols that only the initiated truly understand, and they’re being kept from the masses.
While the guide is thorough, one must acknowledge that the ecosystem is saturated with jargon, which obscures real value propositions; therefore, a more critical lens is essential.